Wednesday, April 19, 2017

Porch Swing - part 3


Searched for some bolts, washers and nuts. I have a few. Most of these are from when I was a mechanic. Usually recalls came with new bolts and nuts. I would just keep the old ones. I believe the bolts I used on this were actually from a prior project I had purchased extra.


I put the supports together. So far I have not  had to purchase  anything for this project, but looks like I will need to pick up some wood to finish. We also may need some paint or stain depending on which finish we settle on. 

Saturday, April 15, 2017

Porch Swing - part 2


Since I used a jigsaw, there will be a lot of sanding to get the pieces more uniform. Next time I may cut at least 2 at a time by clamping the boards together. That might save on sanding.
You need to find a common denominator or like, when sanding a number of pieces that you want to be uniform in shape. Look the pieces over to see where that could be. On these it looked like the front would be the best to align them on. This is where the front board will connect to them together.
Once I sanded that edge, I was able to hold them against a block for support and see all the high and low spots. 


You can see that they are pretty far from being uniform.

Stretch sandpaper


One big issue with sanding a lot, is your sand paper gets packed with dust. When you may think it is used up, it actually is just clogged. Brush it. This is just a brush we had laying around. I'm not sure where it came form. Any brush would work I suppose. LOL, just don't use a wire brush.


You can see here how it cleaned it right up. Its not like new, but it brings it back to sand.

Friday, April 14, 2017

Porch Swing - Part 1

We have been waiting a porch swing for some time. Just Never got around to building one.
Im roughly following the instructions from this video.
April Wilkerson


You can print off templates for this swing off of her website. You should watch her video and give her a thumbs up.
This is her website;


This is what I got so far. I just used a jig saw since I don't have a ban saw.


I will post more pictures as I go.


Thursday, April 6, 2017

Vespa - Running Rich 1.0

The Vespa will start after sitting, then dies. You can smell fuel. I need to put some new fuel in it I know. Figured I would mess with it anyway.

Possible reasons for it to run rich is that the float is not working properly (fills with fuel and not floating) or the needle valve is not sealing or Stuck Choke. I took the fender off, and the cover to the carb.


Pull the air filter off


Choke seemed to be free and working properly. I pinched the fuel line with some vise grips to cut down on the fuel spilling out. Unscrew the bolt that holds on the fuel line. You can undue the hose clamp and pull it off that way if you want. I like doing it this way, because it seems a little tougher to get the hose back on the barb vrs just unscrewing that bolt. Also take out the 2 bolts that holds the float housing. Those 2 bolts have washers that you do not want to drop. I know this, because I dropped one and it took for ever to find it.


Float looks fine, no signs of holes, cracks or wear.


Here you can see the bolt hole that holds the fuel line barb on. The slot above the bolt hole and under the gasket is where the fuel flows into the carburetor. If you clean it, you can hold it so the float hangs down and blow in that slot. The with your finger push the float up to see if the needle valve seals. Mine seemed to work fine.

I took it further apart to see if I could find anything wrong.
On the towel you can se the cap I took off, and the 1 screw that held it on. Under the cap is a plastic screen. It did have some dirt on it. But I don't think that would cause my problems either.

Figured I would take the float off and check out the needle valve. Push the pin out with a drift punch, or really anything you can find. You could use a paper clip if you wanted to.


Everything looks ok. Kind of wish I found something that could be causing my problems.

Looking it over to see if anything is stuck in the holes or dirty. It looks fine to me.

This is one of the bolts that held the float and needle assembly on. With that washer I dropped.


Just put everything back together in revers order.

Leave a comment or question if you have any.

I got everything back together and still have the issue. Probably just need some good fuel in it.

I will post again the next time I work on it.

Wednesday, April 5, 2017

Mower maintenance - Battery

This battery is not maintenance free. I usually get the batteries that require maintenance. They seem to be cheaper and last longer if you take care of them. After saying that look how dirty this battery is.
I just wiped it of with a rag. One these types of batteries you need to check and make sure the water is topped off.

Pull the covers off, check the water level. 


If cells are low, add some water. It is important to use distilled water. I just buy a gallon from Walmart and keep it in the garage. I use this small glass bottle because it is easier to control the pour.
Start it and let it run.

Tuesday, April 4, 2017

Mower Maintenance - Oil Change

Lawn mowers need an oil change like cars do. Even the small push mowers need oil changes. They will last a lot longer, and run better with proper maintenance. 
It was nice out

Things you need to change the oil on a riding lawnmower
  • oil filter
  • oil
  • funnel
  • something to catch the old oil in
  • oil filter wrench, or some big pliers (Chanel Lock Pliers)
  • maybe a wrench, depending on your mower. I did not need it on mine
  • Rags are handy for messes

real quick, You may have already known this... I have this drain pan I picked up at an auto parts place. They have plugs, so it is easier to seal it and carry it. There is a plug in the middle where the main hole is. You can loosen it and it sticks up. it seems like that is the way you use it. Ive been doing it that way for years, and its always a pain to screw it back in. The center plug gets all oily after you drain oil into it. I just pull the plug completely out before draining oil into it. Then put it back in when Im done.

Do you the drain tube? A lot of dirt and grim on it. After wiping it off with a rag, its a lot easier to see. 
On this model, the oil drain is just a cap that is on the right side of the mower. You just twist and pull off.  No need for a wrench. It seals by an O-ring. Make sure you have something under it before pulling the cap off. I could not fit the big car drain pan in. I found a clear plastic container that worked perfectly.


Close up of the oil drain cap on
Inspect the o-ring make sure it is not cracked or anything. wipe it off, and put the cover back on once all the oil is drained.

All Drained? Put the cap back on and move over to the other side and remove the oil filter. If you have an oil wrench good, I got a ton of them too. I have found a big set of channel locks works easier for me. 

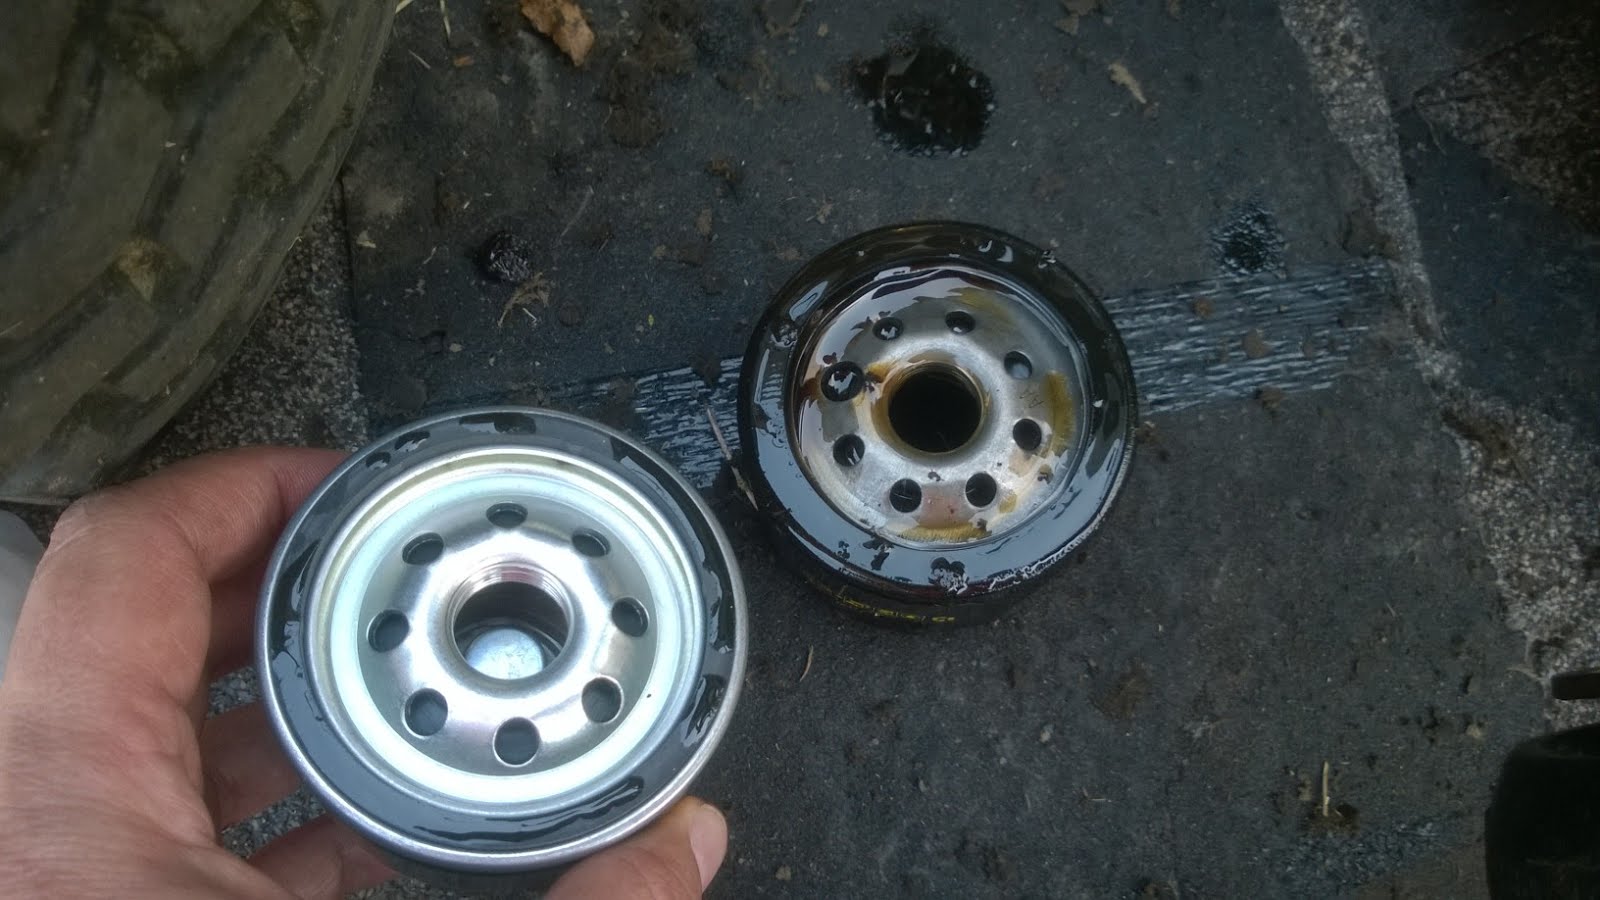
Inspect and make sure your new filter looks similar to the old one. Look to see if the threads and hole are the same. Also check that the gasket is the same size. Just put them end to end.


Put a light coat of oil on the gasket and screw it back onto the engine. Remember when screwing the filter back on it does not have to be gorilla tight.


Put oil back in the engine - Pull the dip stick out and use a funnel to put oil back in the hole the dip stick came out. Do not over fill. You changed the oil filter, so put some oil in until it reads on the full mark on the dip stick. Start the engine for a few seconds to let the oil circulate in the engine and fill the oil filter back up. Then shut the engine off and check the oil again. Add more to to the full mark. Start the engine and let it run, check for any oil leaks. Make sure no leaks around the oil filter, or the drain cap.


I realize I need to do better with pictures. Im not used to taking pictures while I work. After I got in the house to post this, I see that I should have taken a picture of the marks on the dip stick, and a few others. If you have any questions and need a picture, I will see what I can do.

Where ever you purchased your oil from, most of the time they will also take the used oil back. Always dispose of your used oil properly. We have a recycle center close that takes used oil. Auto Parts stores also take used oil. It is easy to do.

Post a comment, let me know if you like this or not.

Lets move onto the next project!


Mower Maintenance - Air and Fuel Filter

Spring is in the Air... Actually had to mow the yard in February this year.

I needed to do some maintenance on the lawn mower to get it ready for this year.

Some of this stuff may seem simple for some people, and I understand that. Once you know this is not hard. You don't know what you don't know.

Today, I changed the Air filter, fuel filter, oil and oil filter on a John Deere LA145 ring lawn mower.

As you can see, it is extremely dirty. Unscrew the 4 attaching screws to the cover. They stay attached to the cover, so once you loosen them, the cover comes off.
Not the dirtiest filter Ive seen, but pretty dirty. The foam piece under was even dirtier. Air flows through it first. The new one comes with a new foam filter as well. Just put them back on in reverse order. If you have any questions just post a comment


Next I replaced the fuel filter. It is located on the left side. It has hoses connected on both sides of it with some compression clamps. In this picture, Ive already used pliers to move the clamps down the hose some. If you have some vise grips you can squeeze the fuel line so that not much fuel leaks out when you pull the lines off the fuel filter. Pull the hoses off. Some will leak out, so do this in a ventilated area.

Old Fuel Filter

Put the new fuel filter in place. The fuel filter has an arrow tells you which way the fuel should flow. You want the arrow pointing to the engine. Fuel flows from the as tank to the engine. Use some pliers and move the clamps back in place.
With New Fuel Filter
I purchased the fuel filter from Was-Mart as well.

If you have any comments or questions please comment. I want to hear from you.

Next up is the oil change, and topping off the water in the battery.

Vespa

We purchased the Vespa about 9 years ago.
It is a 1980 PX200E
2 stoke 200 cc.

When I bought it, I found out it would not charge the battery.

Come to find out, someone put the wrong voltage rectifier on it. Vespa voltage regulators are very expensive. Cost close to $160. I found out most people were using a GY6 12 volt regulator rectifier, so that is what I did and it works perfectly.

The shifter on these are actually in the left handle, and use cables down to the tranny. You squeeze the clutch in and twist. It felt spongy, I ended up replacing the cables shortly after I bought it.

I have not ridden it in a number of years. I used to go out and start it up every so often to make sure it still ran.
The fuel line got hard and would not hold a seal on the carburator. Last year I replaced the fuel line and got it running.
This year it seems to be running extremely rich, and it probably has some bad fuel in it as well.

I worked on it some last night. I will get all the pictures together and blog about the process of getting it running again.


Featured Posts

PedalBoard

Started building myself a pedalboard. Thought about what I wanted in a pedalboard. Room to grow Velcro to attach pedals Place under b...